IM Portal 1.2.0 Manual
 This is the step by step procedure on how you can make the most out of your IM
Portal installation. This
Manual assumes that you have already downloaded and installed IM Portal
successfully in your phpBB
forum. If not, then go to www.integramod.com
and download a copy of the IM Portal
addon. The IM Portal
package
includes the step by step information on how to install IM Portal
into
an existing phpBB
forum. You can also opt to download the IntegraMOD
package which already includes IM Portal as
one of its installed addon.
This is the step by step procedure on how you can make the most out of your IM
Portal installation. This
Manual assumes that you have already downloaded and installed IM Portal
successfully in your phpBB
forum. If not, then go to www.integramod.com
and download a copy of the IM Portal
addon. The IM Portal
package
includes the step by step information on how to install IM Portal
into
an existing phpBB
forum. You can also opt to download the IntegraMOD
package which already includes IM Portal as
one of its installed addon.Note: This Manual is created for IM Portal 1.2.0. If you have a lower version of the addon, it is recommended to upgrade to the latest version. If you have a higher version of IM Portal installed, visit www.integramod.com and download the latest version of the IM Portal Manual.
The image at the right
is a sample image showing what you can do to your website when IM
Portal is installed. This image is taken from the IntegraMOD
homepage
itself which is using IM Portal.
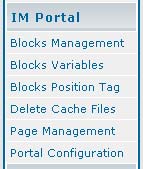
Forum Admin Control Panel
 Everything
that you will do to customize your IM Portal to
your taste and needs
are all easily done through the Forum Admin Control Panel which is
popularly known as the ACP. When you go to your ACP, you will see
new
items in the left frame menu under the category IM Portal.
All
that
you will do with IM Portal are
through these menu items. This
manual is going to discuss each menu item but not in a sequential
manner as it appears in the menu. Instead, the discussion will be
from the creation of a page until the configuration of the portal and
the blocks.
Everything
that you will do to customize your IM Portal to
your taste and needs
are all easily done through the Forum Admin Control Panel which is
popularly known as the ACP. When you go to your ACP, you will see
new
items in the left frame menu under the category IM Portal.
All
that
you will do with IM Portal are
through these menu items. This
manual is going to discuss each menu item but not in a sequential
manner as it appears in the menu. Instead, the discussion will be
from the creation of a page until the configuration of the portal and
the blocks.Portal Page Management

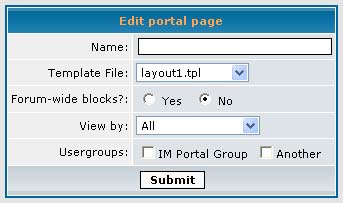 After clicking the
button, you will see something like the image at the right. You
need to specify a name for the page you are going to create. This
name must be descriptive enough to identify the page. The
Template File is the layout you are going to use for your new
page. These files are located in your
templates/YOUR_TEMPLATE/layout directory with the standard phpBB
extension for template files (tpl). As a new feature starting IM Portal
1.2.0, layout files now come with a configuration file with a filename
same of the file but with extension of (cfg). When this file is
available with the layout file, the Blocks
Position Tags (to be discussed later) will be automatically
created for the created page. You can also choose to have your
new page display forum-wide blocks (to be discussed later) or
not. The View by dropdown list tells the portal engine what user
level are authorized to view a portal page. It can be accessible
to All, only by guests, registered users, moderators or only
administrators. Take note that as an administrator, you are
always allowed to view any portal pages. You can also set added
permission per Usergroup. You will see all the Usergroups in your
board if any with a checkbox for each Usergroup. If you tick at
least one of these Usergroups, it will tell the portal engine to only
allow access for those particular Usergroups. If you tick none,
then Usergroup permissions will not be used. When you are done,
just click Submit and your new
portal page is
now created. Again, if a layout config file is available and
position tags are automatically created for that page, you will
see something like the image below:
After clicking the
button, you will see something like the image at the right. You
need to specify a name for the page you are going to create. This
name must be descriptive enough to identify the page. The
Template File is the layout you are going to use for your new
page. These files are located in your
templates/YOUR_TEMPLATE/layout directory with the standard phpBB
extension for template files (tpl). As a new feature starting IM Portal
1.2.0, layout files now come with a configuration file with a filename
same of the file but with extension of (cfg). When this file is
available with the layout file, the Blocks
Position Tags (to be discussed later) will be automatically
created for the created page. You can also choose to have your
new page display forum-wide blocks (to be discussed later) or
not. The View by dropdown list tells the portal engine what user
level are authorized to view a portal page. It can be accessible
to All, only by guests, registered users, moderators or only
administrators. Take note that as an administrator, you are
always allowed to view any portal pages. You can also set added
permission per Usergroup. You will see all the Usergroups in your
board if any with a checkbox for each Usergroup. If you tick at
least one of these Usergroups, it will tell the portal engine to only
allow access for those particular Usergroups. If you tick none,
then Usergroup permissions will not be used. When you are done,
just click Submit and your new
portal page is
now created. Again, if a layout config file is available and
position tags are automatically created for that page, you will
see something like the image below:
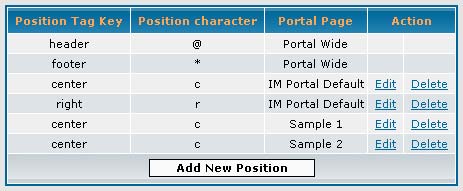
Blocks Position Tag
 If layout config
file is not available, you can manually insert position tags by
clicking Blocks Position Tag.
The following page will be displayed:
If layout config
file is not available, you can manually insert position tags by
clicking Blocks Position Tag.
The following page will be displayed: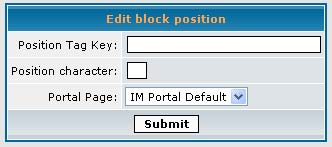 To add a tag,
click Add New Position.
A page which looks like the image in the left must be displayed.
From this page you, must specify the Position Tag Key, a Position
Character that must be unique for each page and the Portal Page where
that position tag will be included. It is easier just to use the
first letter of the Position Tag Key as the Position Character.
Now, how will you know what is the Position Tag Key? To get the
key, you have to open the template layout that you use for the
file. For our example, let us use the included layout1.tpl file
from the package. The contents of the template files is displayed
below:
To add a tag,
click Add New Position.
A page which looks like the image in the left must be displayed.
From this page you, must specify the Position Tag Key, a Position
Character that must be unique for each page and the Portal Page where
that position tag will be included. It is easier just to use the
first letter of the Position Tag Key as the Position Character.
Now, how will you know what is the Position Tag Key? To get the
key, you have to open the template layout that you use for the
file. For our example, let us use the included layout1.tpl file
from the package. The contents of the template files is displayed
below:<tr>
<td valign="top">
<!-- BEGIN center_blocks_row -->
<table width="100%" cellpadding="5" cellspacing="0" border="0"
<!-- BEGIN border -->
class="forumline"
<!-- END border -->
>
<!-- BEGIN title -->
<tr>
<th>{center_blocks_row.title.TITLE}</th>
</tr>
<!-- END title -->
<tr>
<td
<!-- BEGIN background -->
class="row1"
<!-- END background -->
>{center_blocks_row.OUTPUT}</td>
</tr>
</table>
<br />
<!-- END center_blocks_row -->
</td>
</tr>
</table>
Blocks Management
 An IM Portal page
is made up of different portal blocks. To add a block, click Blocks Management. After
clicking the link, you will see something like the image at the
left.
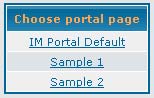
In this page, you will see all the portal pages created in your
website. To manage the blocks in a portal page, click a specific portal
page displayed.
An IM Portal page
is made up of different portal blocks. To add a block, click Blocks Management. After
clicking the link, you will see something like the image at the
left.
In this page, you will see all the portal pages created in your
website. To manage the blocks in a portal page, click a specific portal
page displayed. 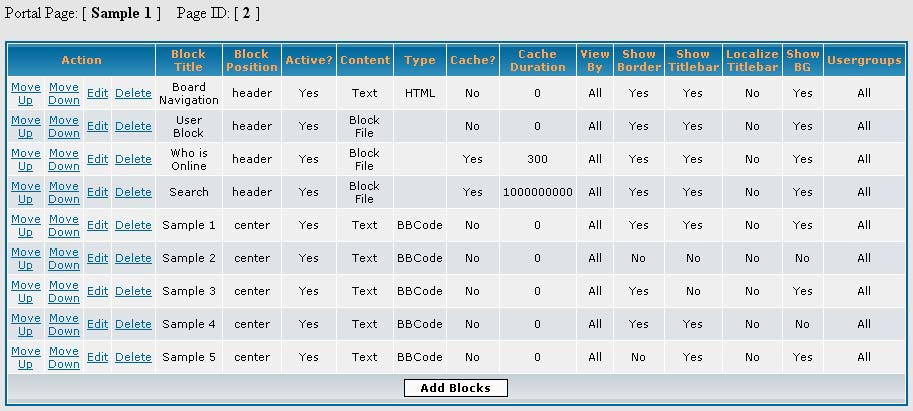
 Starting with
IM Portal
1.2.0, more options are now available when creating a block. You
also don't have to learn any HTML or PHP to create a block since the
standard phpBB
editor is also available to create a block with static content which is
just the same of normal posting of messages in the forum.
Starting with
IM Portal
1.2.0, more options are now available when creating a block. You
also don't have to learn any HTML or PHP to create a block since the
standard phpBB
editor is also available to create a block with static content which is
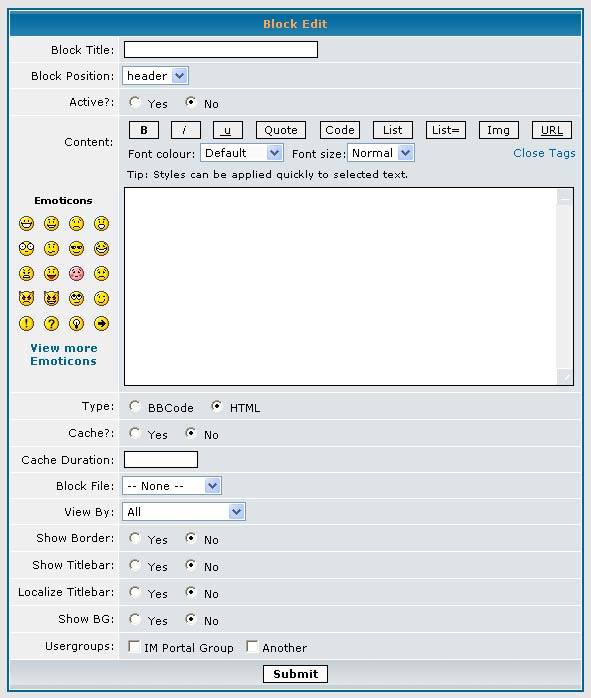
just the same of normal posting of messages in the forum.The Block Title is the text that is to be displayed in the titlebar of the block. It also uniquely identify the different blocks in the blocks management list above. The Block Position tells the portal engine where to position the blocks. Choices include the position tags created for the specific portal page. When forum-wide blocks is enabled for the page, header and footer position tags are also available. You can also opt to make a block Active or not. When NOT Active, the block will not be displayed in the portal page. If you decided, to make it available, you just have to set it as Active.
There are 2 ways to create a block in IM Portal. Through static content using the default phpBB editor or through a Block File. For the static content, you can opt to choose between the use of BBCode or HTML. Just type the content in the editor and choose the Type if it is BBCode and HTML. Creation of static content is that easy. Now, if you want to use a Block File, you can choose among the IM Portal blocks available in the blocks directory. Remember that whenever a Block File and static content is both specified, it would be the Block File that is displayed and not the static content so always choose -- None -- for the Block File if you've wanted static content.
IM Portal blocks can be cached for faster performance and less bandwidth because of lesser connections to the database. Caching option (Cache?) only works with Block Files since static content is automatically cached by the portal engine. Just take note that caching a block makes the block display same information for a number of seconds defined by Cache Duration. Blocks that are user-based like the User Info block must not be cached since it changes for every user. Blocks that also change so often must only be cached for a short time (e.g. Recent Topics block - cache around 60 - 300 seconds). There are also blocks the only display static content but can't be displayed using the editor. A good example is the Search block. In this case, you can cache the content for a longer time (e.g. one day - 86400 seconds).
Blocks access permission is also the same as that of the portal page. By now, you should already be familiar with the permission per user level and per Usergroup.
As another new feature in IM Portal 1.2.0, display of blocks can now also be altered. There are three parts of the blocks that can be enabled or disabled. These parts are the Border, Titlebar and Background (BG). You can now opt to display a block with all these parts displayed, all these parts disabled or a combination of what is enabled or not. Now, for those using the forum in different aside from English, there is also now an option to Localize the text being displayed in the Titlebar. When Localize Titlebar is enabled, the portal engine will not display the Titlebar text (assuming the Show Titlebar is enabled) from the Block Title field. Instead, it will look at the language file included with the block in the directory blocks/lang_xxxxx where xxxxx is the forum language. The retrieved Titlebar text will be from the variable $lang['Title_yyyyy'] where yyyyy is the name of the block (e.g. search for blocks_imp_search.php) which is case sensitive.
If layout template files have layout config files, block files also now have a block config files. So what are these block config files for? Since IM Portal supports individual block configuration through the ACP, Block Variables (to be discussed later) are assigned for each block wherein values can be changed through Portal Configuration (to be discussed later). With the use of these block config files, Block Variables are now automatically inserted in the configuration whenever a block is added. Take note that same block added multiple times in a page or pages will have the same block variables in use. So changes in the configuration for this block will change all blocks added. Same as the portal page, you will know if block variables are automatically inserted for the block when you see something like this:

Block Variables
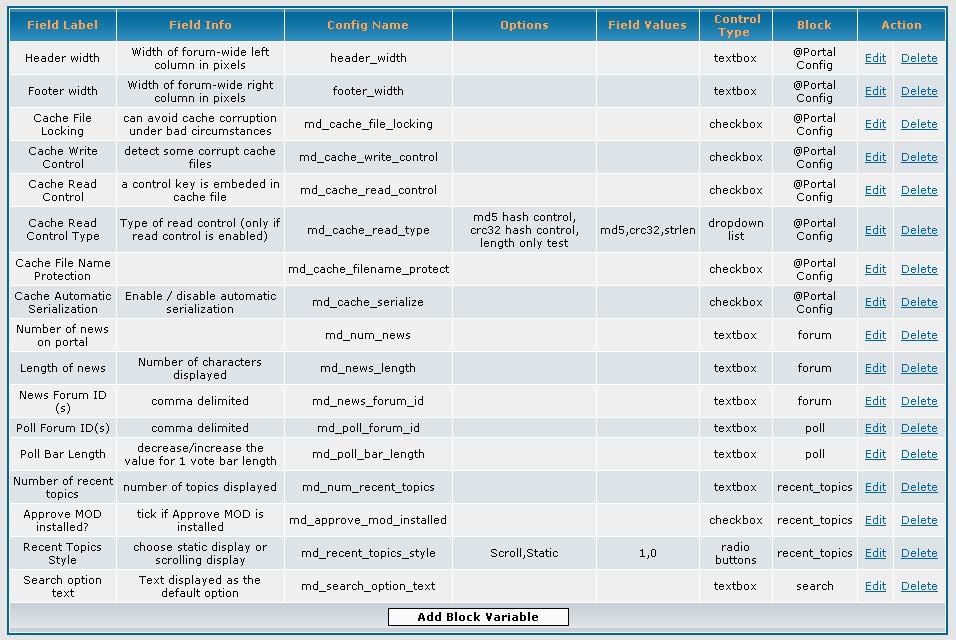
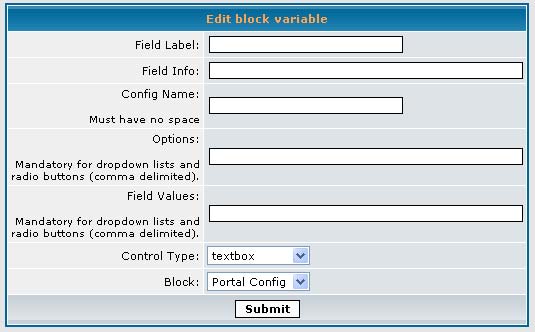 You can add a block
variable by clicking Add Block
Variable and the page like the image at the left will be
shown. The Field Label is the label to be shown in the Portal
Configuration page. The Field Info is an additional descriptive
information on what the field will be used for, what values are being
expected or how should values be specified. The next field, the
Config Name, is the most important information for a block
variable. It must be specified exactly as how it is used in the
blocks or in the portal. Block variables are used using the
$portal_config array and config name is used for defining a variable in
an array accessible by $portal_config['xxxxx'] where xxxxx is the exact
config name.
You can add a block
variable by clicking Add Block
Variable and the page like the image at the left will be
shown. The Field Label is the label to be shown in the Portal
Configuration page. The Field Info is an additional descriptive
information on what the field will be used for, what values are being
expected or how should values be specified. The next field, the
Config Name, is the most important information for a block
variable. It must be specified exactly as how it is used in the
blocks or in the portal. Block variables are used using the
$portal_config array and config name is used for defining a variable in
an array accessible by $portal_config['xxxxx'] where xxxxx is the exact
config name. Options and Field Values are always used side by side. They must be specified when Control Type chosen is either dropdown lists or radio buttons. Options must be a comma delimited labels that will be shown as choices in the dropdown lists or radio buttons (e.g. Yes,No). Field Values on the other hand are the values the variable will take if the corresponding choice in the Options are chosen (e.g. 1,0) It must also be comma delimited with number of items exactly the same with that of Options.
The Control Type defines how this control will be displayed in the Portal Configuration page. There are four choices, namely, textbox, dropdown list, radio buttons and checkbox. A textbox is for variables wherein the specified value will be used. Dropdown lists and radio buttons are used for variables with a set of selectable values and expected values can only be from this set. A checkbox is just for a variable with values of either 1 or 0 (a radio button or drop down list can also be used for this purpose but a checkbox is the most direct and easy way).
The Block dropdown list is only used to identify for which block the variable is going to be used. You can also identify if it is not used in a specific block by choosing Portal Config. This field does not affect the use of a variable and is just here to help the administrator identify in the Portal Configuration page for which block that variable is to be used.
Portal Configuration
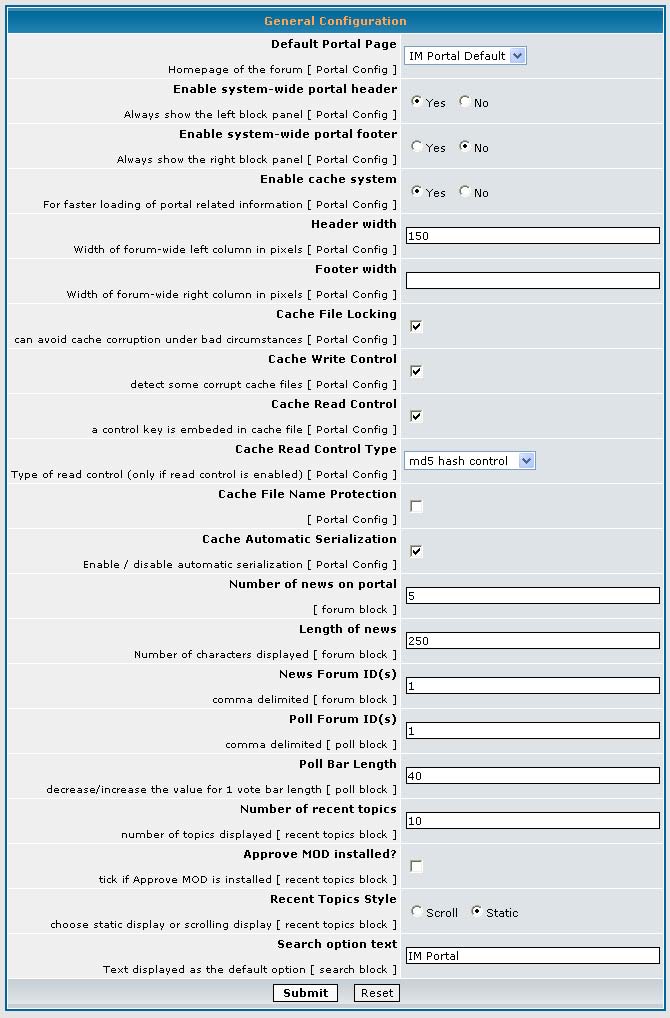 IM Portal
is totally configurable through the ACP by clicking the Portal Configuration link. At
the right is a sample portal configuration page. Some of the
fields in this page are portal default and the rest are from the Block
Variables page. The options to be discussed in this manual are
only those fields that are considered Portal-wide.
IM Portal
is totally configurable through the ACP by clicking the Portal Configuration link. At
the right is a sample portal configuration page. Some of the
fields in this page are portal default and the rest are from the Block
Variables page. The options to be discussed in this manual are
only those fields that are considered Portal-wide.Default Portal Page
This is just the same as making a portal page default in Page Management. The dropdown list contains all the portal pages you have created using Page Management and you can easily select one to make the portal default page.
Enable system-wide portal header
When enabled, header (left column) blocks will be available for all pages in your forum.
Enable system-wide portal footer
When enabled, footer (right column) blocks will be available for all pages in your forum.
Enable cache system
You can opt to enable or disable the cache system being used by the Portal. Take note that the cache system, when enabled, will give increased performance for your website.
Header/Footer width
You can define the width of forum-wide left and right columns in pixels.
Cache File Locking
Enable/disable cache file locking and when enabled, can avoid cache corruption under bad circumstances.
Cache Write Control
Enable/disable write control (the cache is read just after writing to detect corrupt entries). Enable write control will lightly slow the cache writing but not the cache reading.
Cache Read Control
If enabled, a control key is embedded in cache file and this key is compared with the one calculated after the reading.
Cache Read Control Type
Type of read control (only if read control is enabled). The available choices are: md5 hash control (best but slowest), crc32 hash control (lightly less safe but faster, better choice) and length only test (fastest).
Cache File Name Protection
If set to true, you can use any cache id or group name. If set to false, it can be faster but cache ids and group names will be used directly in cache file names so be careful with special characters. (you don't have to worry about assigning cache id or group name because it is automatically handled by the portal engine). False setting is faster.
Cache Automatic Serialization
It can be used to save directly data which aren't strings but it is slower. It is ideal to set it to true but if you want faster performance, you can opt to set it to false. As of now, no problem is being reported for setting it to false. But in case of problems when setting it to false, just leave the item set to true.